Classic Highway Car Avoidance Game Template
Documentation version 5
- Item Name : Classic Highway Car Avoidance Game Template
- Item Version : Version 5
- Author by : NeuronDigital
- Email : melvin@neurondigital.com
Getting Started #back to top
This is a classical highway car avoidance game template. The aim of the player is to tilt his device to steer his car away from oncoming traffic. Thanks for buying this template! Hope you have as much fun customising it as I did building it.
Setting up the Android App#back to top
Before You Start
-
Make sure your have Android Studio 3.6.3 installed and in the Android SDK Manager make sure you have the following installed:
- Google USB Driver
- Android API 29 SDK
Try to place the project file as close to root (C:/) as possible as windows has a path character limit of 240chars. So, if you get the error:"Failed to crunch file...", reduce the path length.
Importing and running
-
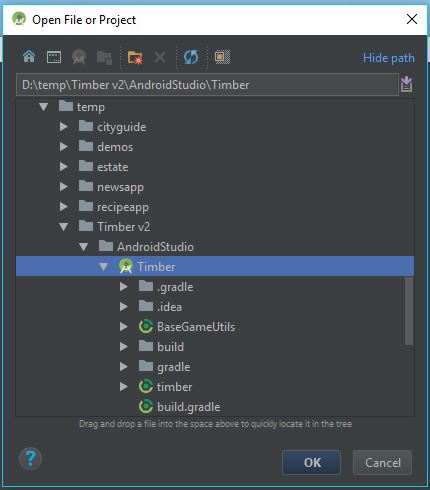
Step 1 - Open up Android Studio and click 'open an existing Android Studio project'.

-
Step 2 - Drag and drop the 'Highway Speed' folder in the dialog to go quickly to the folder.
-
Step 3 - Make sure 'Highway Speed' is highlighted and click 'ok'.
-
Step 4 - Press the Play button to test the app on the emulator or connect your phone via usb to your computer to try it on your phone.

Changing Package name
This step must be done else you will have problems uploading to Google play and the Rate feature will not work.
-
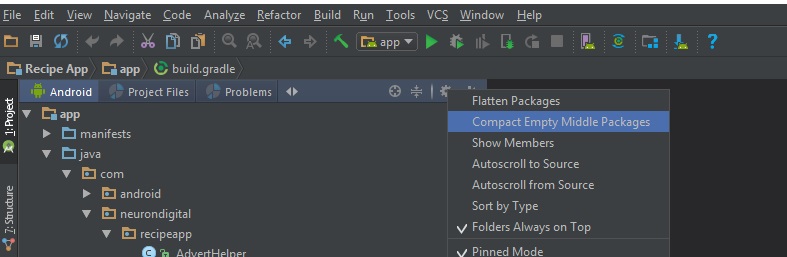
Step 1 - Make sure the 'Compact Empty Middle Packages' option is deselected as shown below.
-
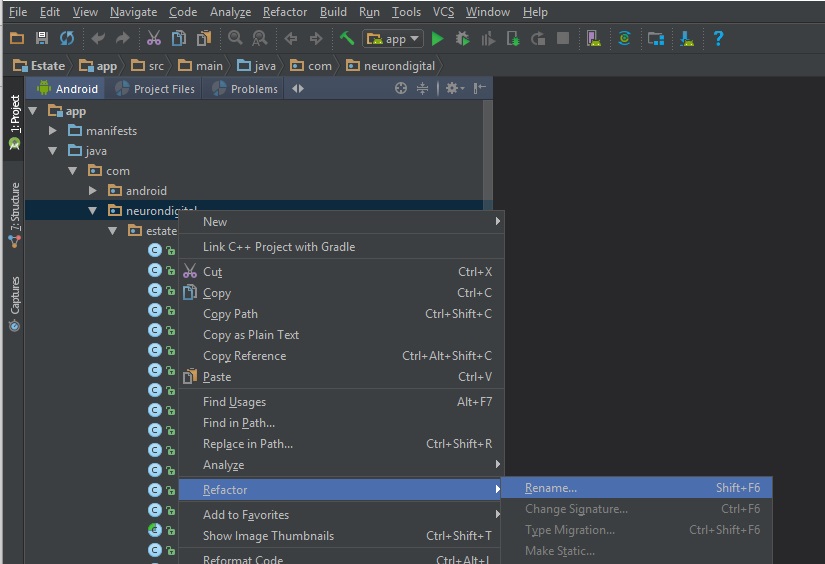
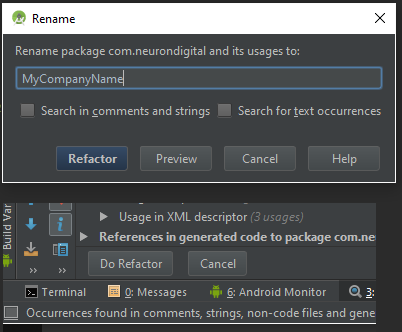
Step 2 - Rename the package id by right clicking on 'neurondigital' and selecting 'refactor' and 'rename' as shown below.
-
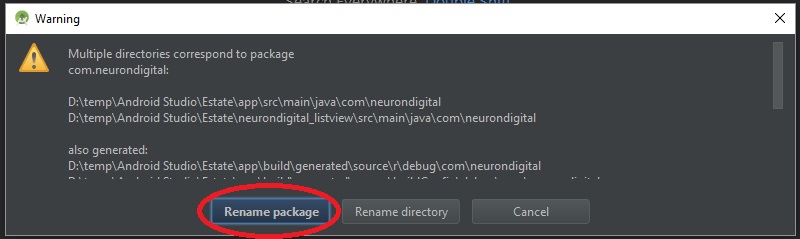
Step 3 - Click Rename package.
-
Step 4 - In the popup menu type in your company name. Then press 'refactor' and in the next popup window press 'Do Refactor'. Do the same for 'jumper'. The package name should be in this format: com.yourcompany.AppName
-
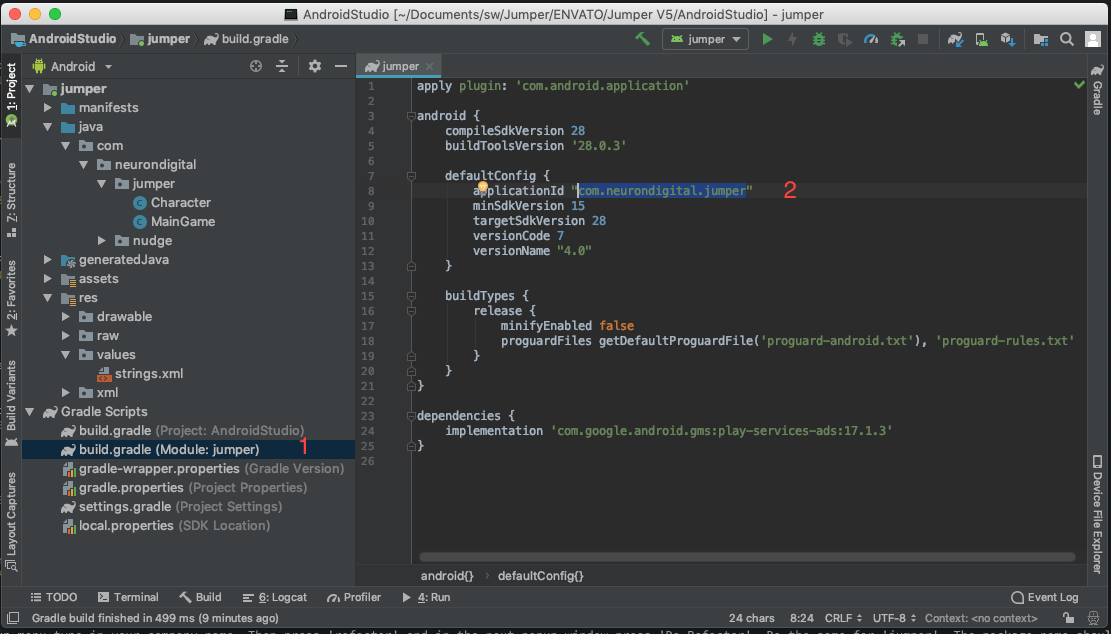
Step 5 - Open Highway Speed/build.gradle and put in the same package id as before instead of the 'com.neurondigital.highwayspeed'. This is shown below.
Replace icon and Images
-
Most of the images have with them included the .PSD or .ai file. So feel free to edit them as you like especially the Cars and Street background. Remember to keep the same image resolution before replaceing it with the one in eclipse. The images can be found under jumper/res/drawable. To replace the images just copy/paste the image in the drawable folder to replace the other.

Replace Audio and Music
-
The audio can be found under /res/raw. To replace the audio just copy/paste the sound file in the raw folder to replace the other. The Game has one music file (music.mp3), which is loopable throughout the game. There are also 2 SFX files, one for menu clicks and the other for Score. Just replace these files with equivalent to change music or sound.
Add AdMob Banner Ads (optional)
-
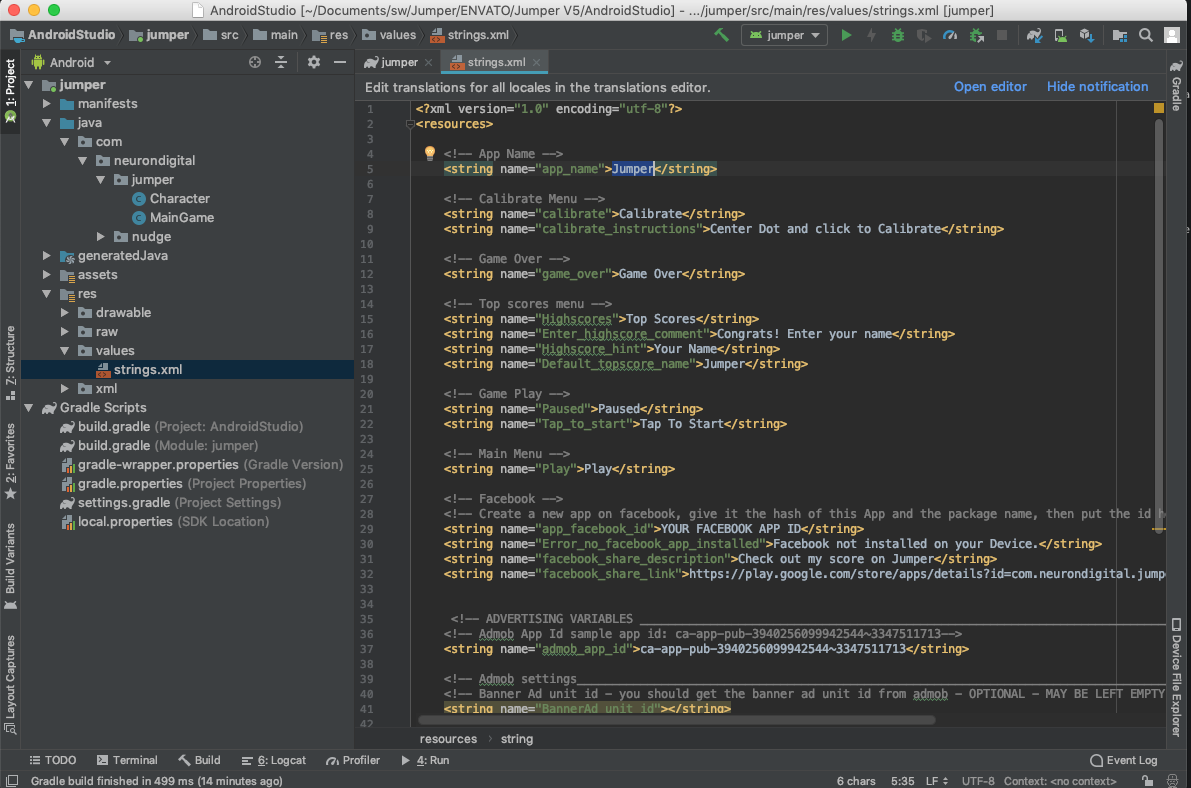
Create a Banner Ad on AdMob and paste the AD unit Id and App unit Id in the strings.xml file. The Ad displays in the bottom of the screen. Ideally to not annoy the user, it's either the banner or the interstitial ad, so you may wish to leave one of the Ad IDs in strings.xml empty.
Translation
-
All translatable text is contained within the strings.xml file.
Further Personalisation
There are 3 main files you need to modify to personalise the Game: HighwaySpeed.java, Surface.java and strings.xml. Everything that must or is recomanded to be modified is tagged by 'TODO', so look out for it when changing the code (on eclipse it is marked blue on the right side).
HighwaySpeed.java
This file contains the starting code. The only things you might want to change from here are the admob settings.
Surface.java
This file contains the main code. From here you need to change the Car generation rates, speed, points, size of images and everything related to the game. If you renamed the images make sure you correct their reference from this file.
1) To add a Car / Star
Goto Surface.java line 79 and add values like in the code below. If you make a positive number as points the new object would act as a car. Meanwhile, if you put in a negative number the object would act as a Star (giving its points on collision)
//TODO: change Cars/Stars/trees/stones (obstacles) from here
Bitmap[] obstacle_img = new Bitmap[17]; //obstacle number (this number was incremented from 16)
final int stone1_left = 0, blue_lane1_car = 1, blue_lane2_car = 2, red_lane1_car = 3, red_lane2_car = 4, tree1 = 5, star_lane1 = 6, silver_lane3 = 7, silver_lane4 = 8, pink_lane3 = 9, pink_lane4 = 10, star_lane3 = 11, stone2_left = 12, stone3_left = 13, stone2_right = 14, stone3_right = 15, NEW_CAR = 16; //obstacle names, which would be called later on in level creation.
int[] obstacle_points = new int[] { 0, 2, 2, 4, 4, 0, -10, 10, 10, 8, 8, -10, 0, 0, 0, 0, 10 }; //obstacle points. make negative for stars (items that increase points when collided with)
int[] obstacle_speed = new int[] { 0, 40, 40, 30, 30, 0, 0, -20, -20, -1, -1, 0, 0, 0, 0, 0, 40 }; //obstacle speed
int[] obstacle_lane = new int[] { 0, 1, 2, 1, 2, 5, 1, 3, 4, 3, 4, 3, 0, 0, 5, 5, 2}; //obstacle lane. 0:left grass, 1 to 4:lane1-4, 5: right grass.
2) Assign an image to the new car.
	obstacle_img[14] = BitmapFactory.decodeResource(getResources(), R.drawable.stone2);
	obstacle_img[15] = BitmapFactory.decodeResource(getResources(), R.drawable.stone3);
	obstacle_img[16] = BitmapFactory.decodeResource(getResources(), R.drawable.new_car_image);
3) Add it to the generation list to be generated
Goto line 571. In our case, to add the new car to be generated from time period 0 to 500, just add the name you gave to the car to the list..
	obstacles_at_timeperiod(0, 500, new int[] { blue_lane1_car, blue_lane2_car, pink_lane3, pink_lane4, stone2_right, tree1, stone2_left, stone3_right, NEW_CAR }, 70, 8);//generate blue_lane1_car,blue_lane2_car... from the first 0 to 500 game time. Generation rate is 70. The car has a max speed of 8.
	obstacles_at_timeperiod(500, 1000, new int[] { blue_lane1_car, red_lane2_car, pink_lane3, pink_lane4, star_lane1, stone2_left, stone3_right }, 80, 8);
	obstacles_at_timeperiod(1000, 2000, new int[] { red_lane1_car, red_lane2_car, pink_lane4, star_lane3, stone2_right, tree1, stone2_left }, 80, 8);
	obstacles_at_timeperiod(2000, 3000, new int[] { red_lane1_car, red_lane2_car, pink_lane4, pink_lane3, star_lane3, stone2_right, tree1, stone2_left, stone3_right }, 80, 8);
Export your App as a .APK for Google Play
-
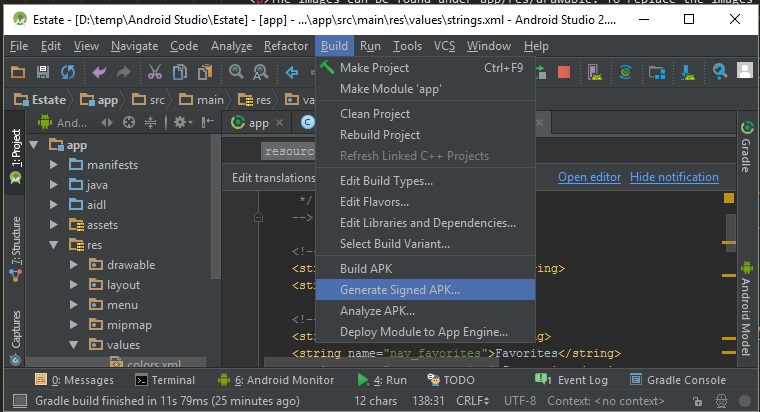
Go to Build| Generate Signed APK... and export the .APK file.
Support Desk #back to top
If you need any support,
- First check the FAQ questions of the item on codecanyon.
- If you don't find anything there check the item comments section.
- If you still don't find your answer it would be best to ask your question in the comments section for others to see.
- For private support, please send me a message via my Codecanyon page.
- * Responding to questions or problems regarding the item and its features
- * Fixing bugs and reported issues
- * Providing updates to ensure compatibility with new software versions
- * Customization and installation services
- * Support for third party software and plug-ins
- * Make sure your question is a valid Theme Issue and not a customization request.
- * Make sure you have read through the documentation and any related video guides before asking support on how to accomplish a task.
- * Make sure to double check the template FAQs.
- * If you have customized the template and now have an issue, back-track to make sure you didn't make a mistake. If you have made changes and can't find the issue, please provide us with your changelog.
Version History (Changelog) #back to top
						-----------------------------------------------------------------------------------------
						Version 1 - Oct 2013
						-----------------------------------------------------------------------------------------

						- Initial Upload

                        -----------------------------------------------------------------------------------------
						Version 2 - June 26, 2014
						-----------------------------------------------------------------------------------------

						- Bug Fixes

						-----------------------------------------------------------------------------------------
						Version 3 - June 26, 2014
						-----------------------------------------------------------------------------------------

						- Bug Fixes
						- Added Android Studio Version

                        -----------------------------------------------------------------------------------------
						Version 4 - May 7, 2020
						-----------------------------------------------------------------------------------------

						- Updated to support Android v29
						- Removed Eclipse Version
						- Non personalised (npa) Ads only to avoid using Advertising id for gdpr