Ultimate Recipe App Template
Documentation version 6
- Item Name : Ultimate Recipe App Template
- Android Item Version : Version 5.2
- iOS Item Version : Version 1
- Author by : NeuronDigital
- Email : melvin@neurondigital.com
Getting Started #back to top
This documentation will help you familiarise yourself with the 'Ultimate Recipe App Template' Android App, iOS App and the web based Admin page. It is suggested that you first upload the admin page to your server and make sure it is working before continuing to the Mobile Apps. The Mobile Apps will work fine using the demo server, however it is required to setup firebase for them to work well without errors. The setup of Firebase is explained in the Admin Page Video Tutorial.
Setting up the admin Page #back to top
Before You Start
- 1. Make sure your server supports PHP 7.3.8 or above and MySQL.
- 2. In the video tutorial the free hosting offered by www.byet.host was used. Recently I noted that this is not working anymore with their free version. So feel free to use any other hosting you wish, or you might wish to pay for their premium hosting, which should work.
Uploading To Server
-
Step 1 - Upload the contents of the 'Server Side Code' to your server. Make sure you don't forget the .htaccess.
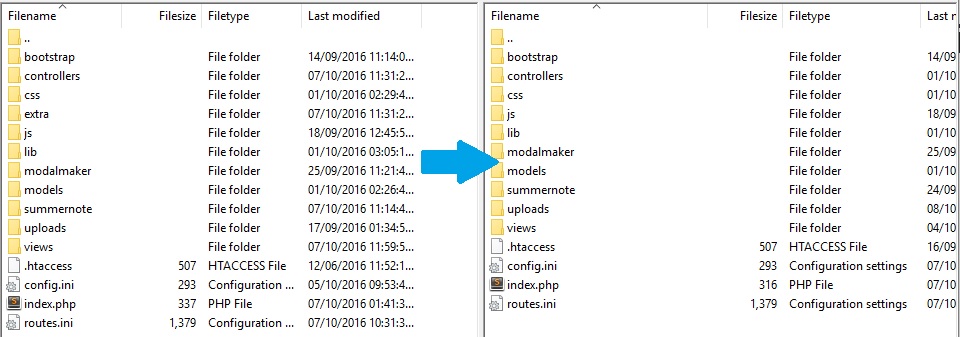
- Step 2 - Create a new MySQL database and import 'RecipeApp_SQL_DB.sql'.
-
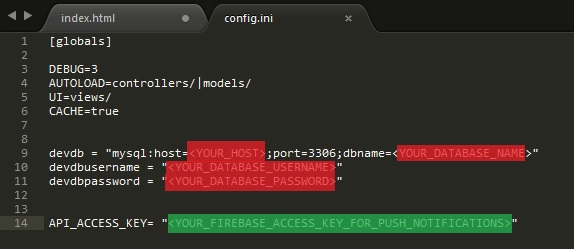
Step 4 - Put your database details (Host, database name, user name, and password) in config.ini. The fields are marked with red below. Also, replace the 'serverurl' with your server url and the 'sharetwittertag' with your twitter tag. These will be used to create your metatags, for sharing and seo.
-
Step 5 - Access the /index.php file that you just uploaded to your server, using your browser. The default login credentials are:
										Username: admin
										Password: pass
Setting Firebase Push Notifications (only Android)
-
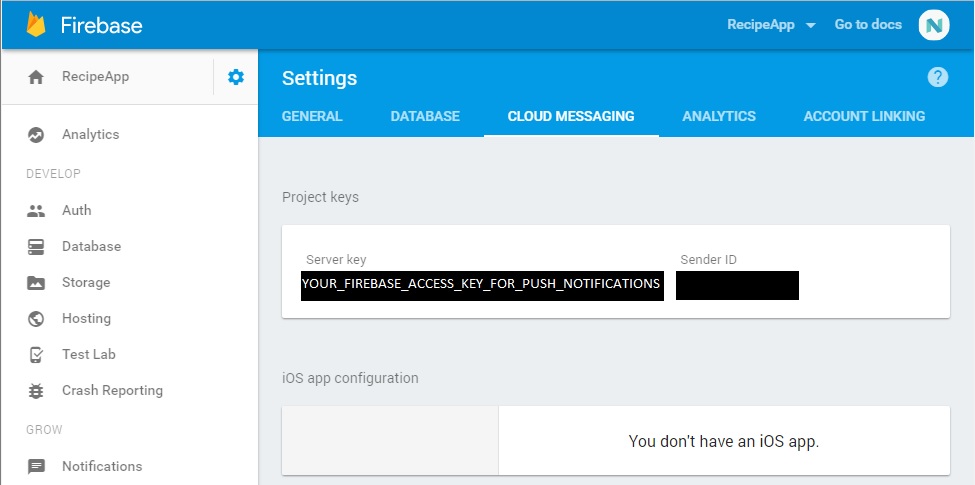
Step 1 - Go to your Firebase Console, go to settings->cloud messaging and get your server key (API_ACCESS_KEY). Put this in config.ini. The field is marked with green above.
- Step 2 - Admin Page Done!
Setting up the Android App#back to top
Before You Start
-
Make sure your have Android Studio 3.1 installed and in the Android SDK Manager make sure you have the following installd:
- Build tools v28.0.3
- Androidx SDK Tools
- Google USB Driver
- Android API 28 SDK
-
Try to place the project file as close to root (C:/) as possible as windows has a path character limit of 240chars. So, if you get the error:"Failed to crunch file...", reduce the path length.
Importing and running
-
Step 1 - Open up Android Studio and click 'open an existing Android Studio project'.

-
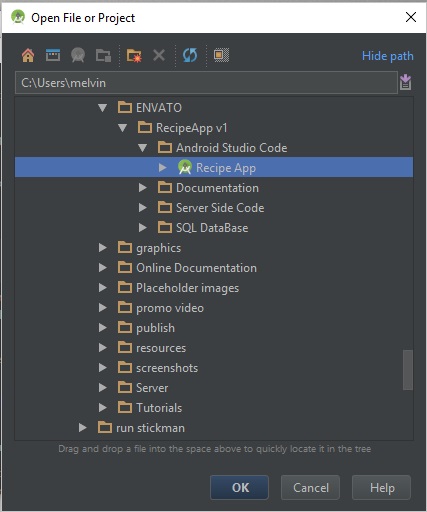
Step 2 - Drag and drop the 'Recipe App' folder in the dialog to go quickly to the folder.
-
Step 3 - Make sure 'Recipe App' is highlighted and click 'ok'.
-
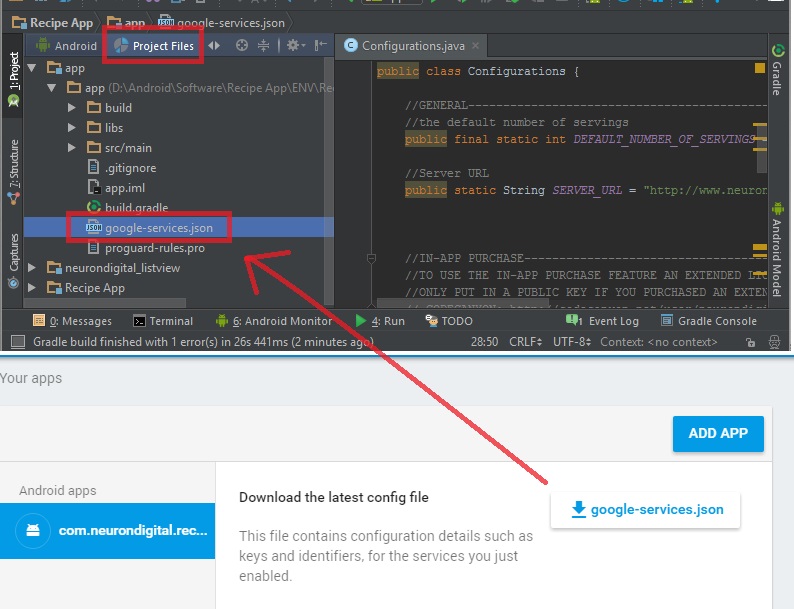
Step 4 - Go to your Firebase Console and download the 'google-services.json' file and replace the placeholder in app/google-services.json. This step is included in the Admin Page video - If you skip this step you will encounter an error during compile time.
-
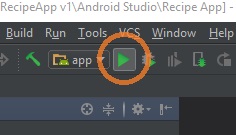
Step 5 - Press the Play button to test the app on the emulator or connect your phone via usb to your computer to try it on your phone.
Changing Package name
This step must be done else you will have problems uploading to Google play and the Rate feature will not work.
-
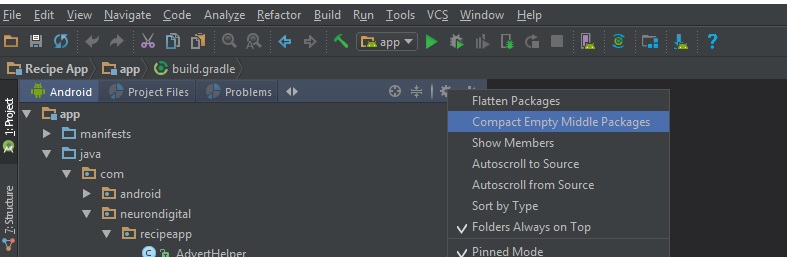
Step 1 - Make sure the 'Compact Empty Middle Packages' option is deselected as shown below.
-
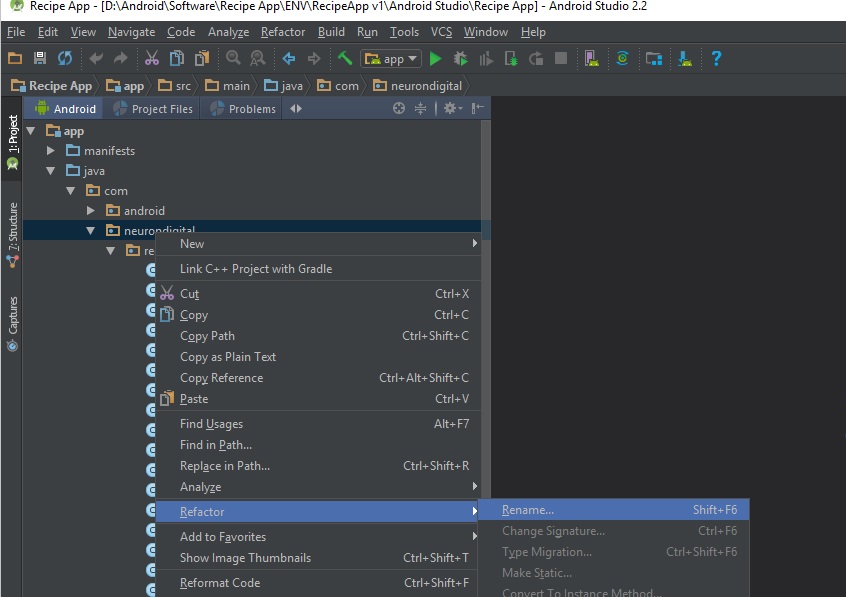
Step 2 - Rename the package id by right clicking on 'neurondigital' and selecting 'refactor' and 'rename' as shown below.
-
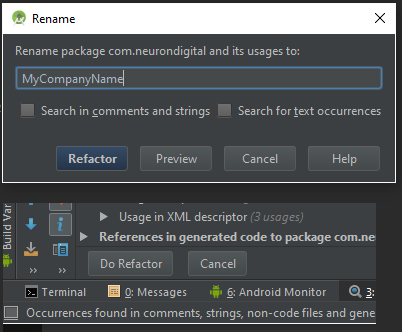
Step 3 - In the popup menu type in your company name. Then press 'refactor' and in the next popup window press 'Do Refactor'. Do the same for 'recipeapp'. The package name should be in this format: com.yourcompany.AppName
-
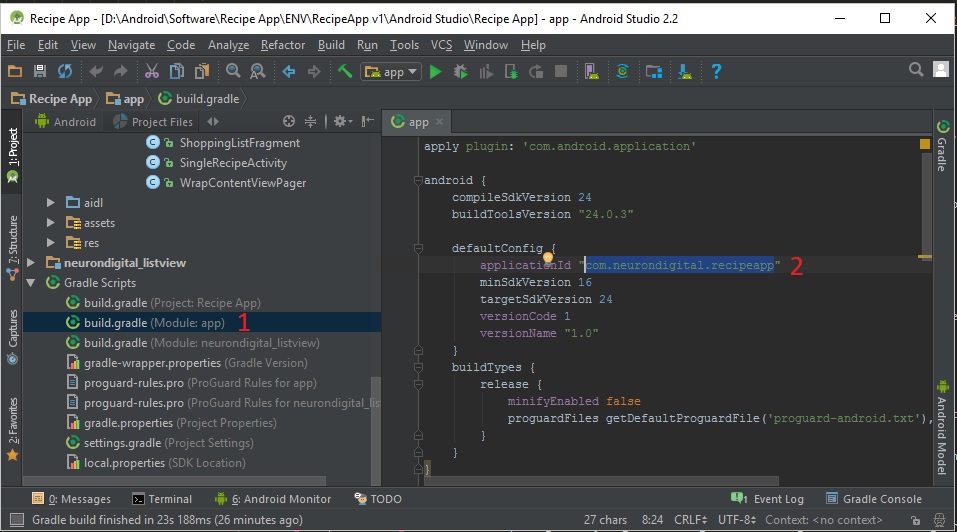
Step 4 - Open app/build.gradle and put in the same package id as before instead of the 'com.neurondigital.recipeapp'. This is shown below.
App Customisation
-
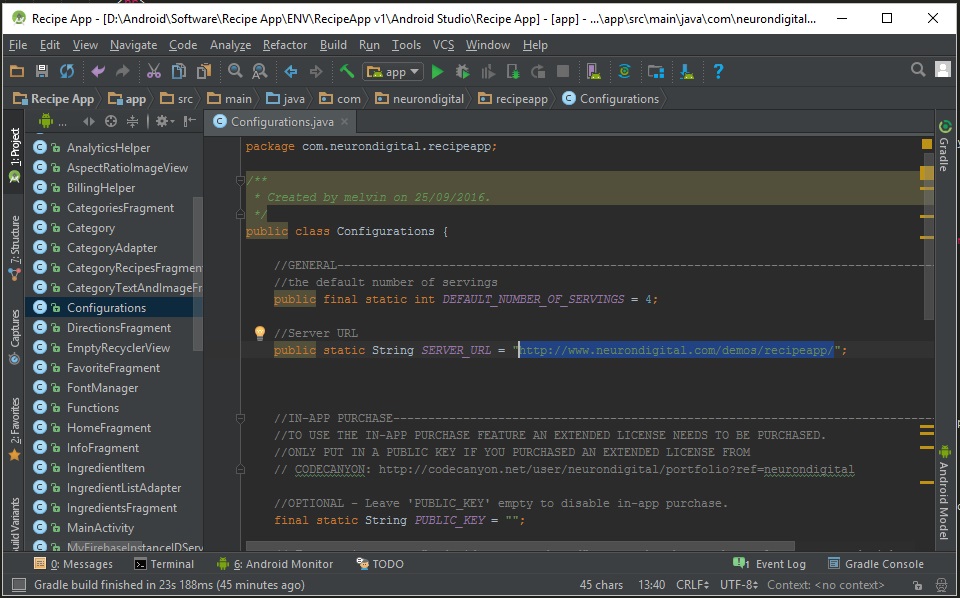
Step 1 - Put in your Server url in Configurations.java
-
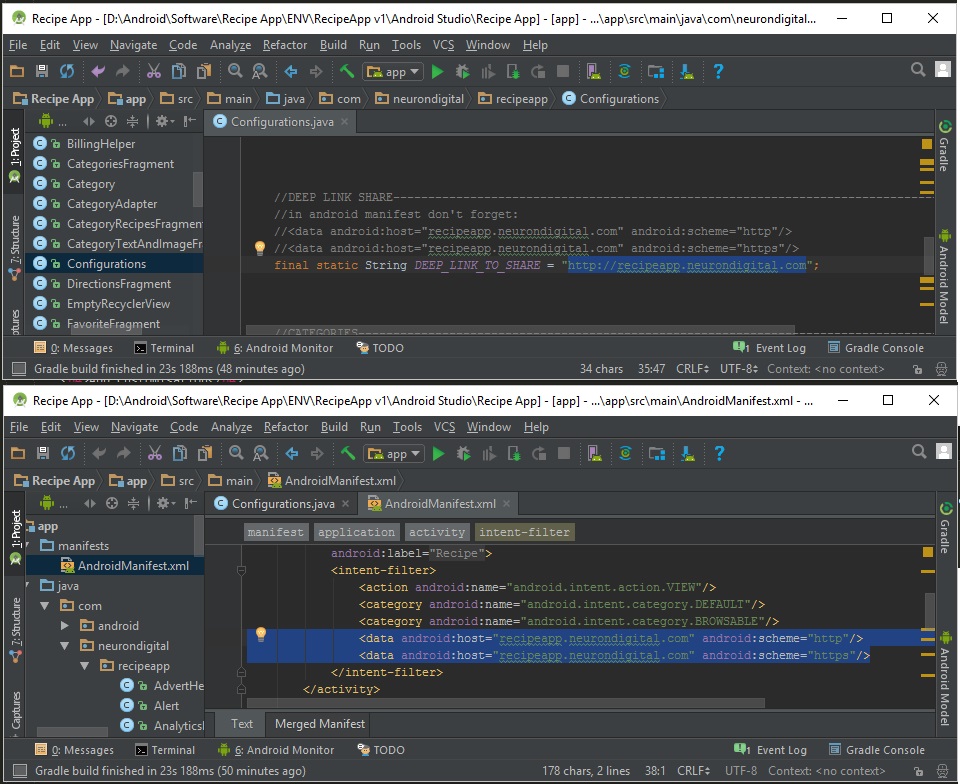
Step 2 - Replace the share deep link url in Configurations.java and in AndroidManifest.xml. When the user opens a url that matches the url you specified here, it would be opened up in the recipe app. If the app is not installed, the url would be opened in the browser. In this case the recipe will show in the mini web app (Available in version 4).
Replace icon and Images
-
The images can be found under app/res/drawable. To replace the images just copy/paste the image in the drawable folder to replace the other.
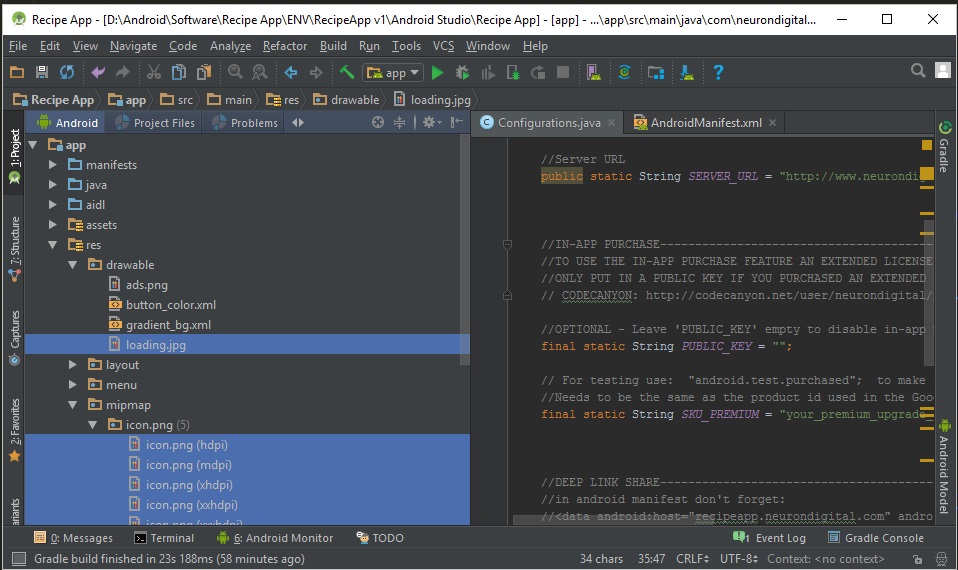
-
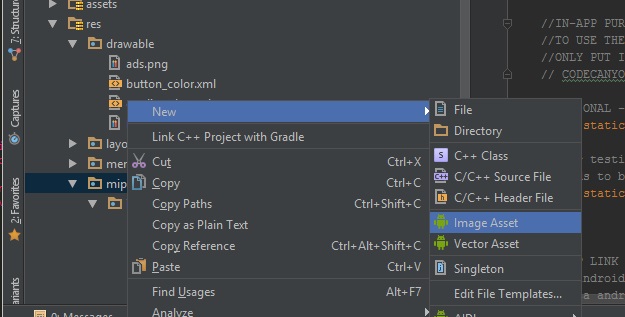
The icons can be found in app/res/mipmap. Notice that there are different sizes. To replace the icons just right-click->new->Image Asset and select your image.
Add AdMob interstitial Ads (optional)
-
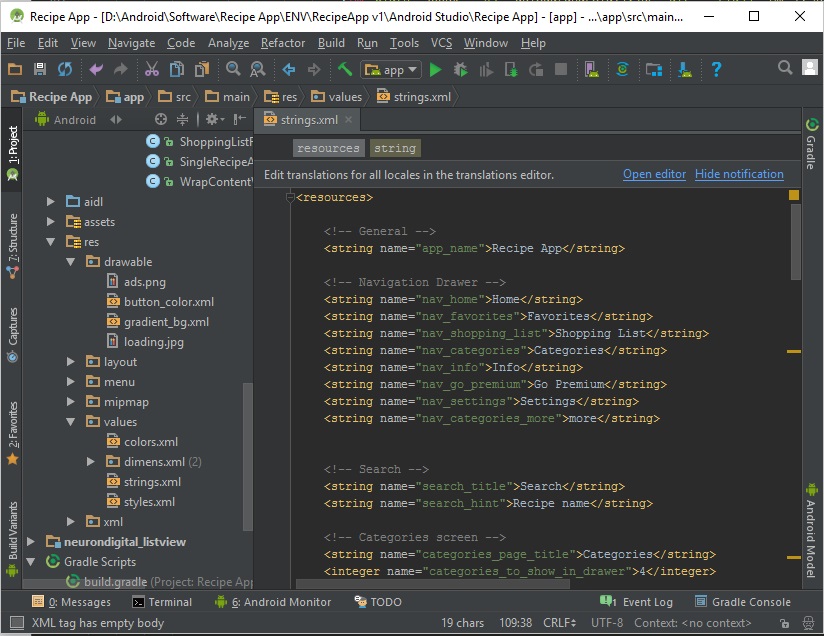
Create an interstitial Ad on AdMob and paste the AD unit Id in the strings.xml file. The Ad displays when the user clicks a recipe in home. Make sure to add this to start making money from your App. The display rate can be changed from strings.xml from the ad_shows_every_X_clicks parameter.
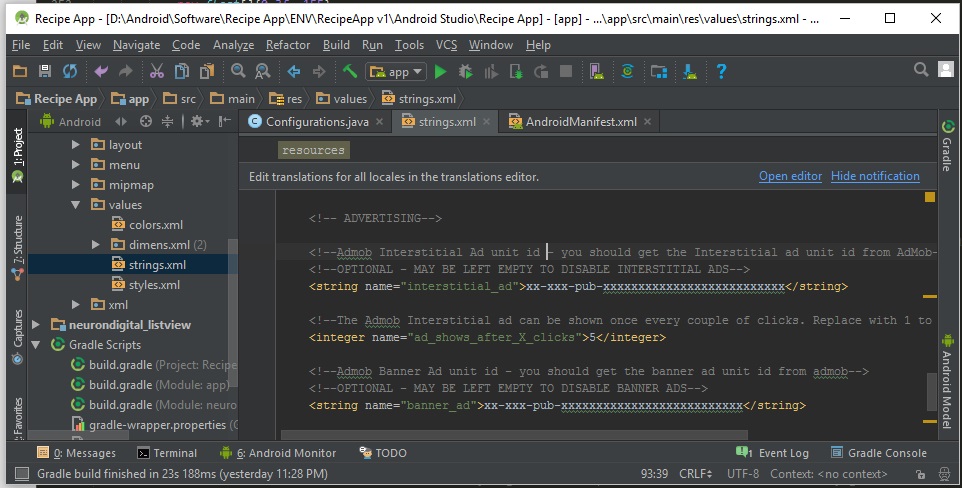
Add AdMob Banner Ads (optional)
-
Like the interstitial Ad, create a Banner Ad on AdMob and paste the AD unit Id in the strings.xml file. The Ad displays in the bottom of the screen. Ideally to not annoy the user, it's either the banner or the interstitial ad, so you may wish to leave one of the Ad IDs in strings.xml empty.
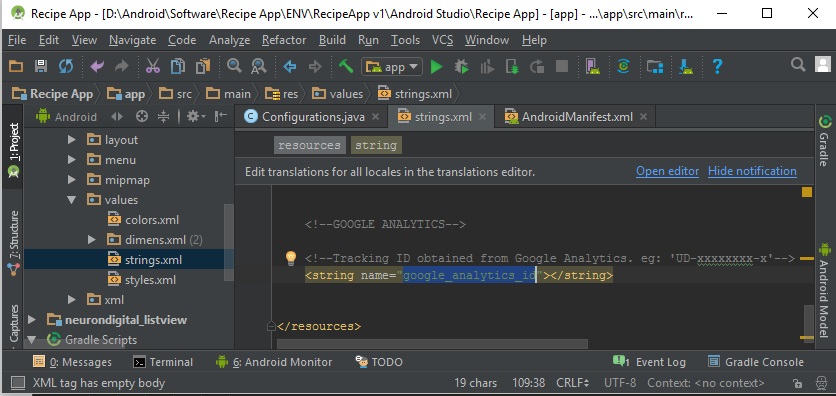
Google Analytics (Removed in v5.0 - Use firebase Analytics instead)
-
Create a new google Analytics property and you'll be provided with a tracking id which should have this format: "UA-xxxxxxxx-xx". Put this tracking id in strings.xml in the 'google_analytics_id' field.
In-App Purchase
To use this feature you need to purchase an 'Extended License' of the template from CodeCanyon. This feature is not covered in the 'Regular License.'
-
Step 1 - The template allows for the user to purchase a premium upgrade to remove ads using google Play In-app Payments. Before doing so, create your app in Google Play Dashboard and locate the 'Public Key' as it can seen below:
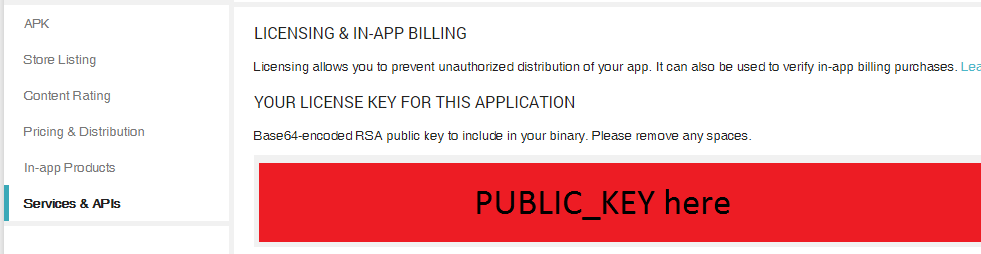
-
Step 2 - Then add a new in-app product and give it a Product id.
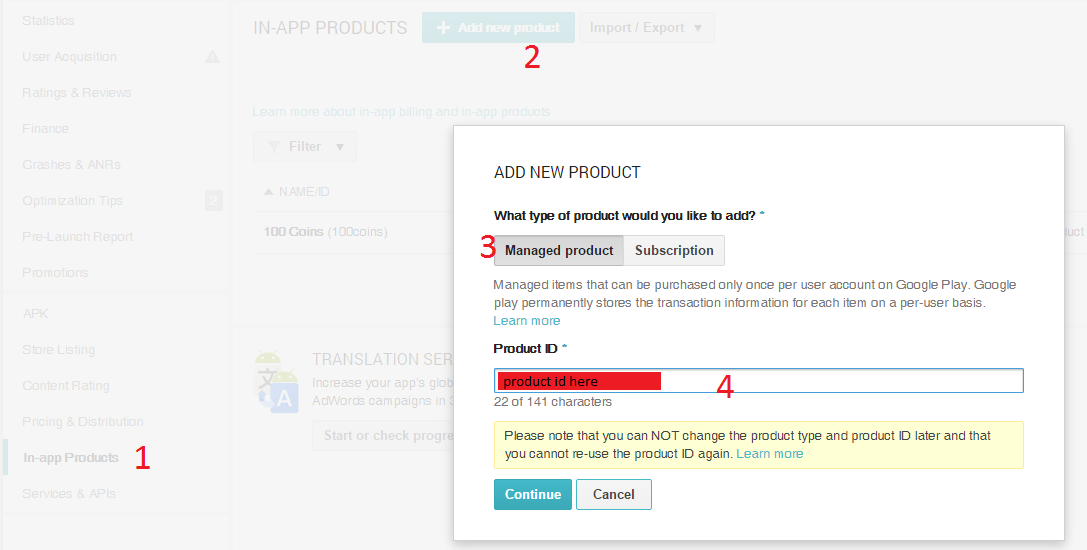
-
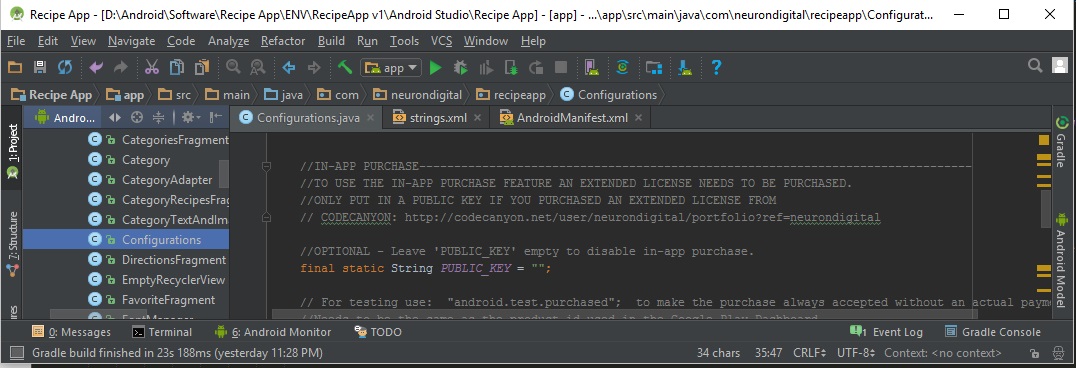
Step 3 - Finally, put your Public Key and product id in configuration.java:
Translation
-
All translatable text is contained within the strings.xml file.
Export your App as a .APK for Google Play
-
Go to Build| Generate Signed APK... and export the .APK file.

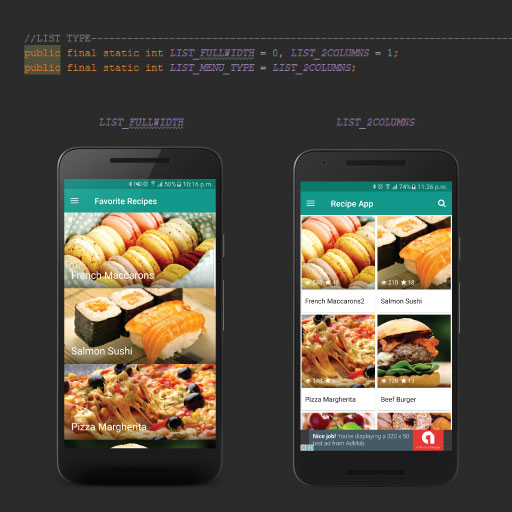
Grid View or Card View
-
Go to Configurations.java. Replace the LIST_2COLUMNS in the second line displayed below, with LIST_FULLWIDTH if you wish to use card view.
You Are Done!
-
Make sure to keep up with the template updates and bug fixes on our facebook page.
Setting up the iOS App#back to top
Before You Start
Make sure your have the following:
- A Mac computer. XCode works only on mac (not windows)
- XCode 11.3 - More Info Here
- Latest Cocoapods - Install it from here: cocoapods.org To find out more about Cocoapods see this video: youtu.be/iEAjvNRdZa0
- Apple Developer Account - You need this to upload apps to the App Store and also to access some XCode features. Enroll here: developer.apple.com
- CocoaPods app (optional) - Instead of using terminal commands to update Pods you might find it easier to use the CocoaPods App. Install it from here: cocoapods.org/app
Importing and running
-
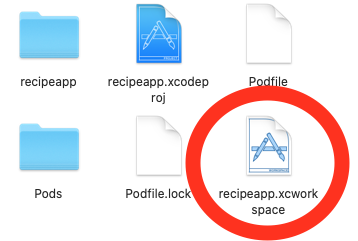
Step 1 - Open recipeapp -> recipeapp.xcworkspace. Make sure you open the white file, not the blue file.
-
Step 2 - Click on the 'recipeapp' project file to open the project settings. From here rename the Display Name and Bundle Id. The bundle id should be in this format: com.yourcompany.AppName
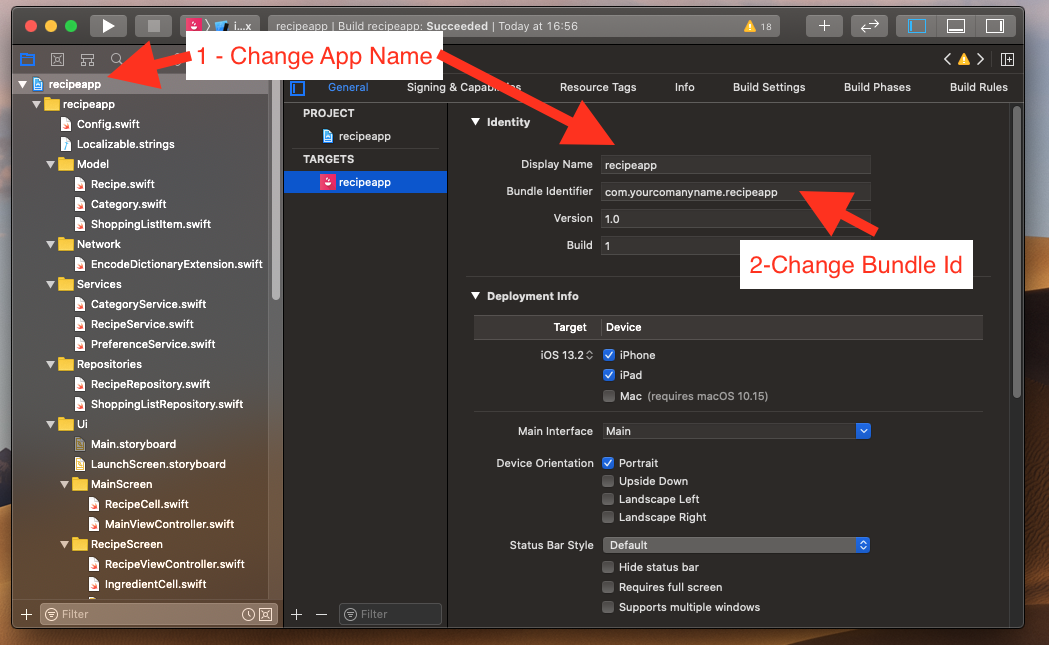
-
Step 3 - From the project settings open the 'Signing and Capibilities' tab. Select your own team from the 'team' field.
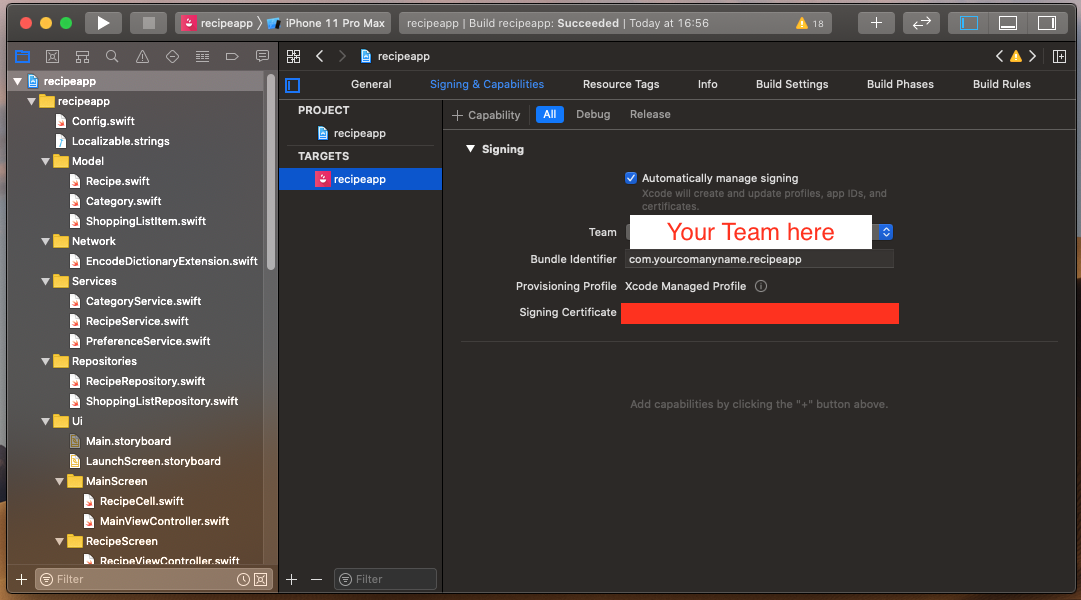
-
Step 4 - Select a simulator or a real device from the top left corner of XCode and press the play button

Connect to Server
-
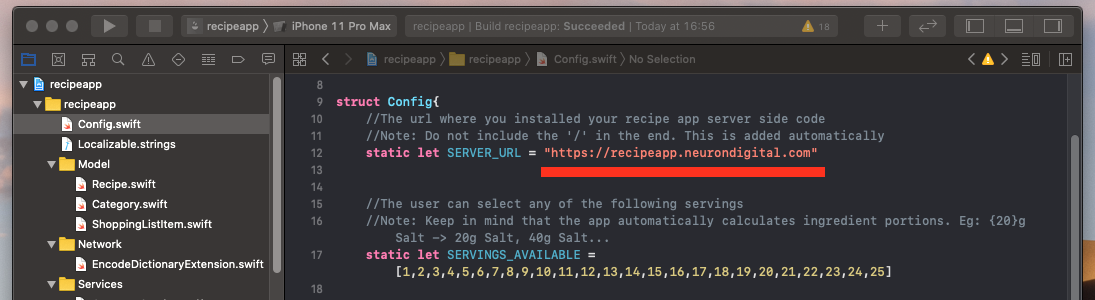
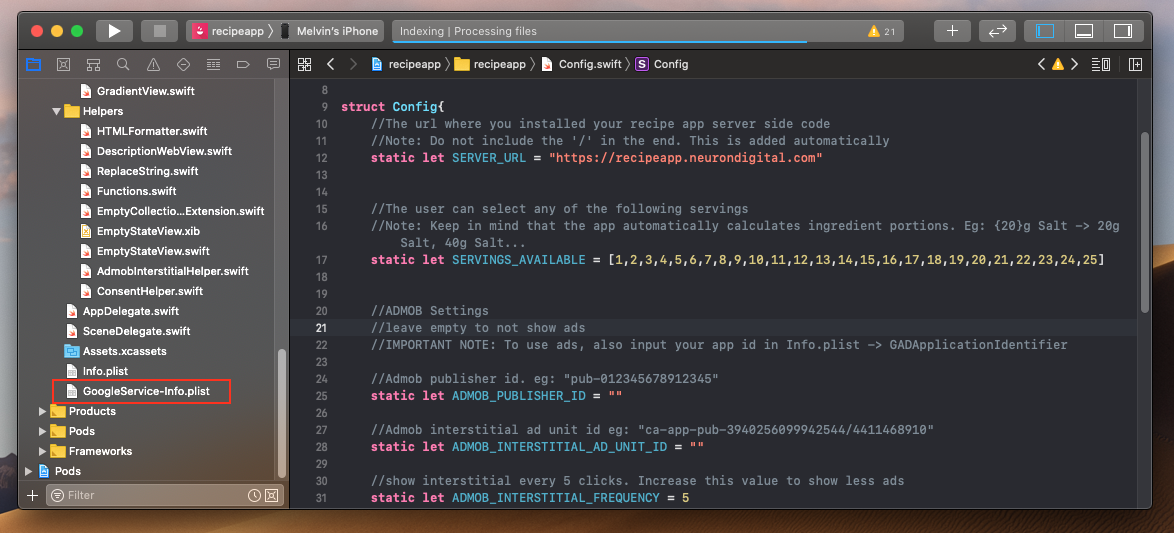
Step 1 - Put in your Server url in Config.swift. Do not include the '/' in the end, since this will be added automatically.
Replace Icon, Images and Colors
-
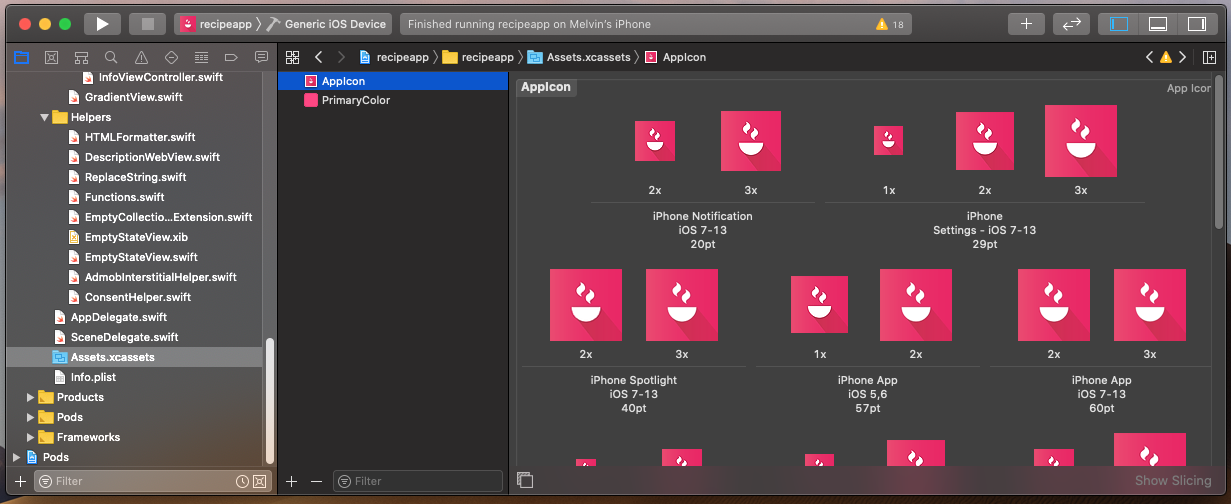
The app icon can be changed from Assets.assets. iOS needs the same icon in different sizes for different devices and screens. So create a single 1024px x 1024px icon in your favorite editing software then generate all te icons using a tool like appicon.co
-
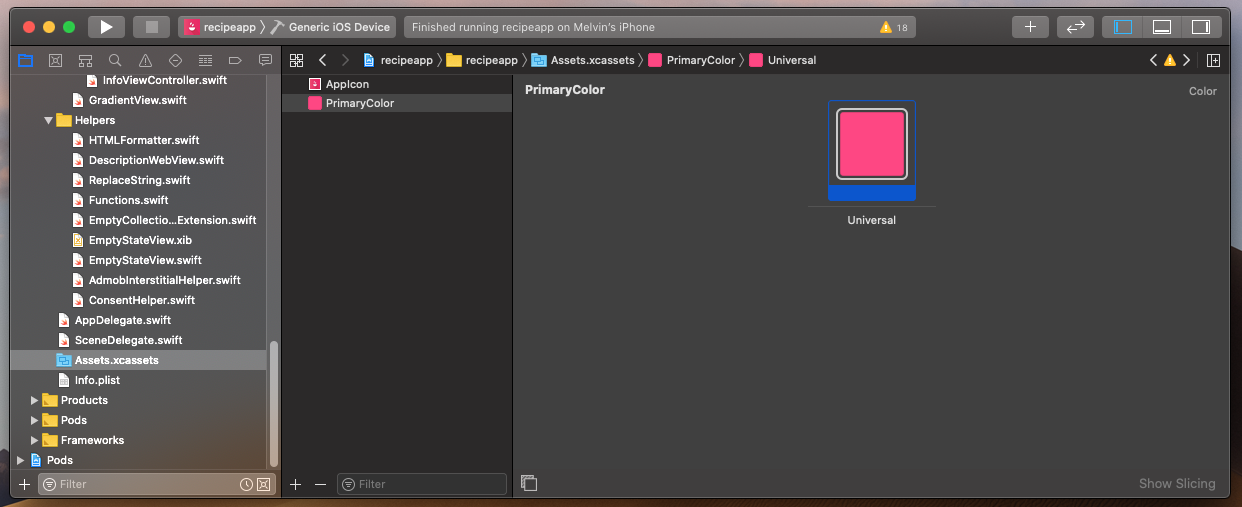
The primary color of the app can be changed from Assets.assets. Select 'PrimaryColor' and replace it.
-
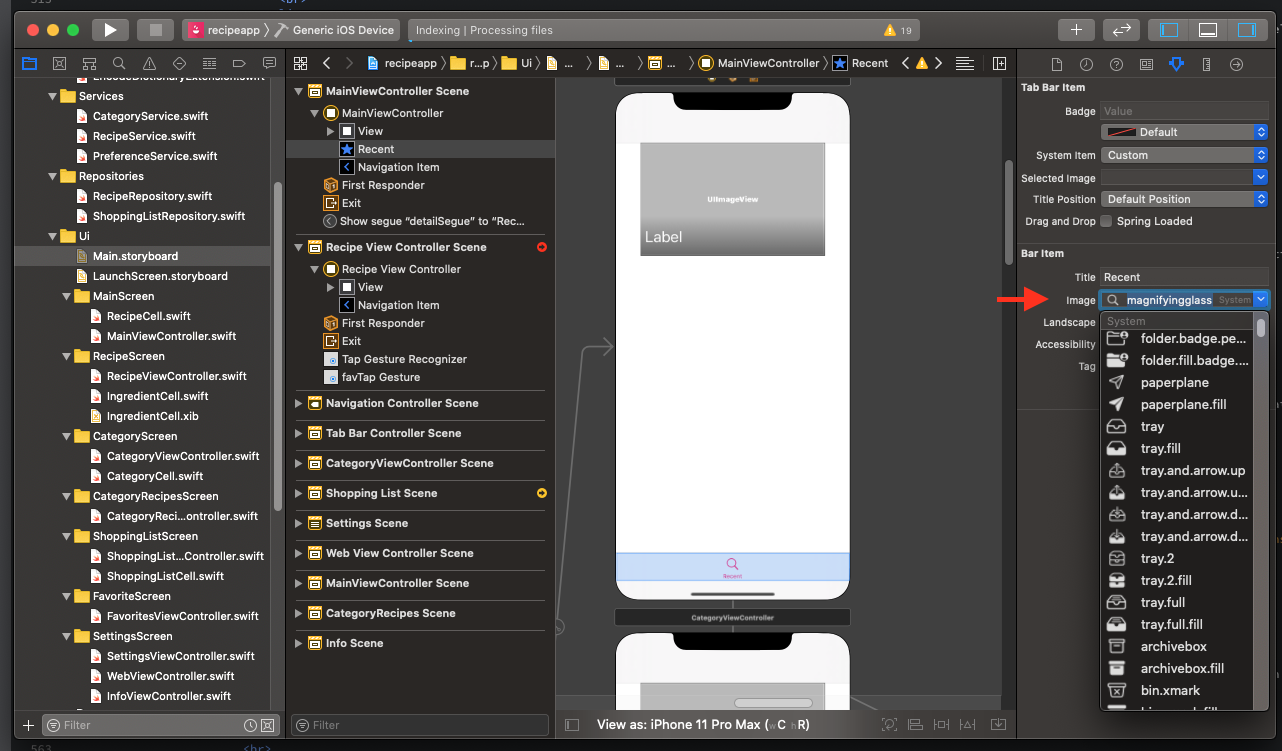
The template makes use of the iOS system icons. These system icons are referenced by their name (eg: magnifingglass). Most of the icons can be changed from the storyboard and .xib files However there are some dynamic icons that need to be changed through the swift files.
Add AdMob interstitial Ads (optional)
To enable admob ads you need to fill in 3 Ids
-
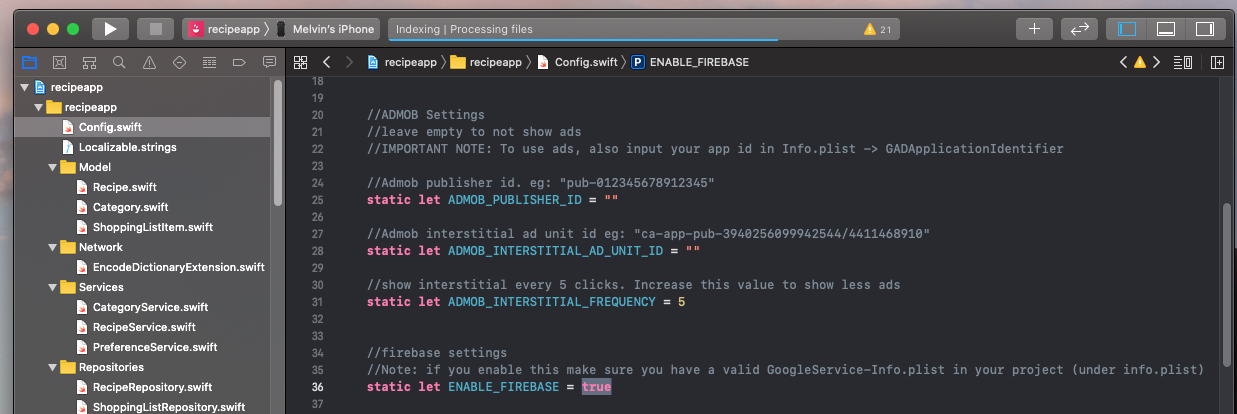
Create an interstitial Ad on AdMob and paste the AD unit Id in the Config.swift file.
-
Get your publisher id from Admob and put it in the Config.swift file. This is used for the GDPR consent.
-
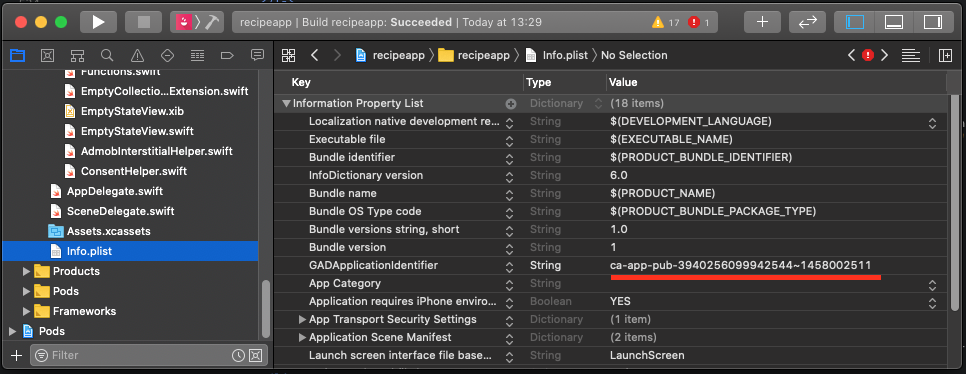
Get the App Id from Admob. Replace the GADApplicationIdentifier value in Info.plist with your App Id.
Firebase Analytics (optional)
-
Go to your Firebase Console, create an ios App for your project and download the 'GoogleService-Info.plist' file. Put it in XCode below the info.plist file.
-
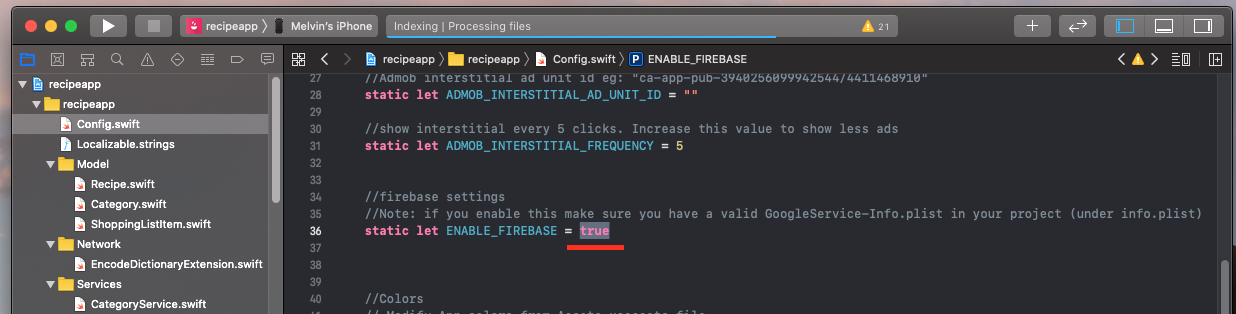
Enable firebase Analytics from Config.swift
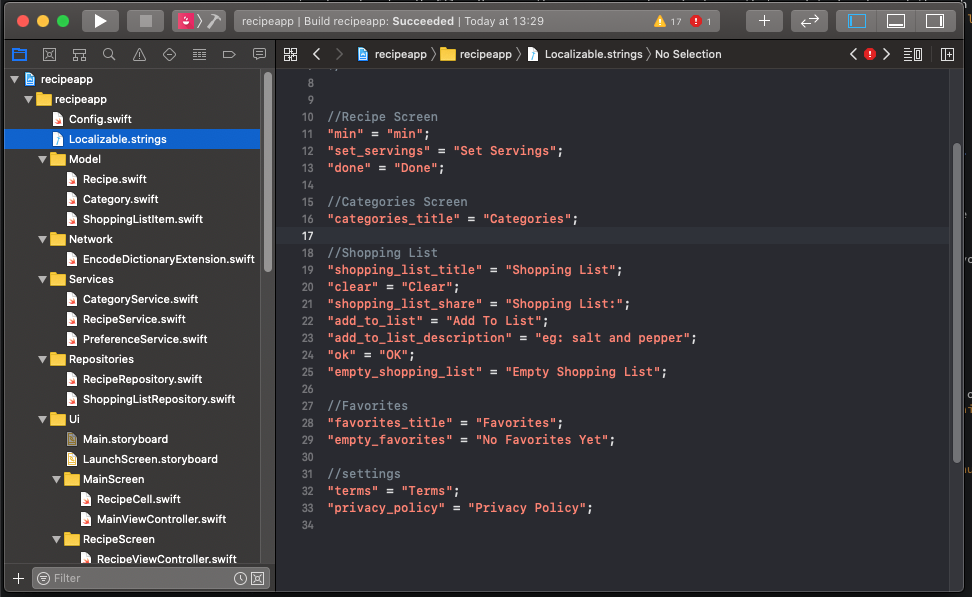
Translation
From project settings, select the main project (recipeapp) and add languages by pressing the '+' button. Then go to the file you need to translate and select the languages you added for your project.
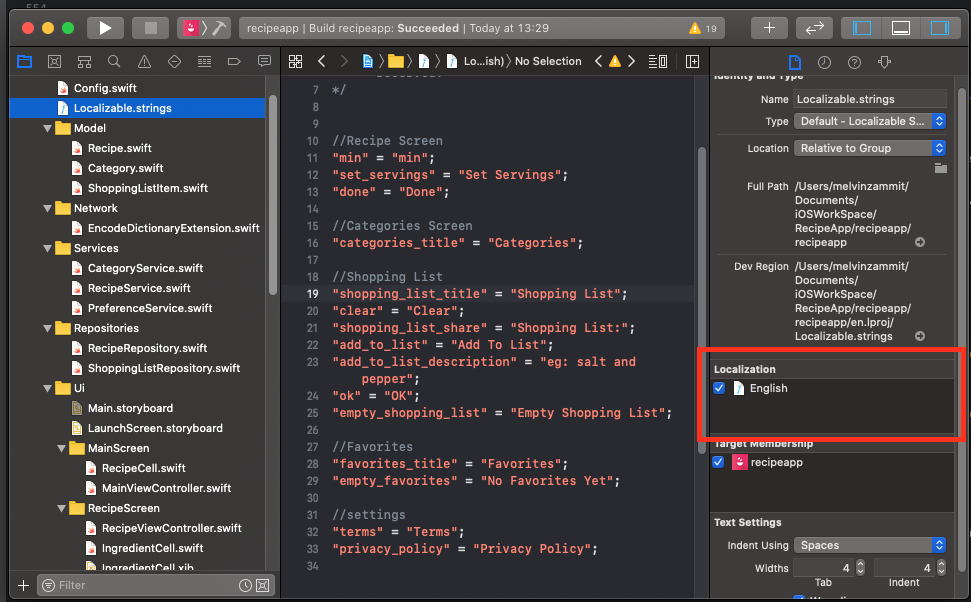
There are 2 files you need to translate:
-
Main.storyboard
-
Localizable.strings - All the other text used in the swift files is placed in Localizable.strings.
Export and Upload To App Store
-
Go to Product -> Archive
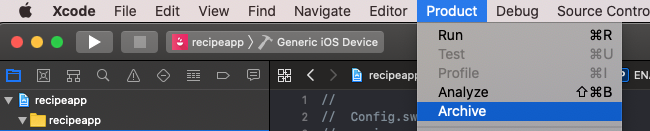
-
For more info on how to submit your app on the App Store, please watch this video tutorial: https://youtu.be/vqmZ_-MCM20
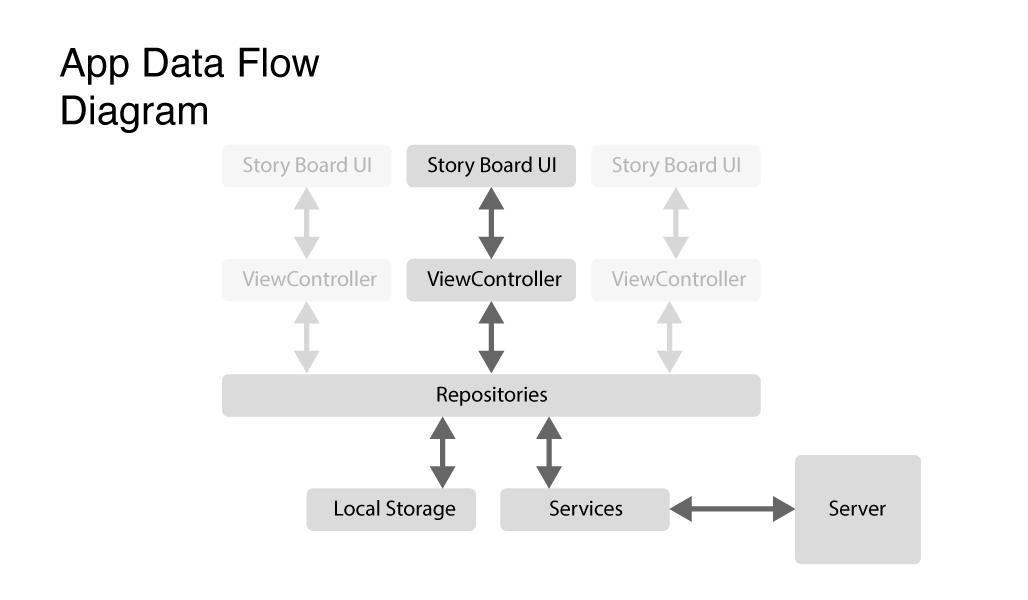
Details for advanced users
-
The template follows a programming pattern used in most apps to handle data.
- Data is loaded from the server using the Services files. All the code related to the server is in these files.
- The Repository files combine local data with the server data. This set files are basically an abstraction layer for the local storage and the data obtained through the server.
- Most of the control code is in the ViewController itself.
- The Model files store the data obtained from the server, that needs to be presented to the user.
You Are Done!
-
Make sure to keep up with the template updates and bug fixes on our facebook page.
Support Desk #back to top
If you need any support,
- First check the Knowledge Base/FAQ.
- Check the item comments section.
- If you still don't find your answer it would be best to ask your question in the comments section for others to see.
- For private support, please send me a message via my Codecanyon page.
- * Responding to questions or problems regarding the item and its features
- * Fixing bugs and reported issues
- * Providing updates to ensure compatibility with new software versions
- * Customization and installation services
- * Support for third party software and plug-ins
- * Make sure your question is a valid Theme Issue and not a customization request.
- * Make sure you have read through the documentation and any related video guides before asking support on how to accomplish a task.
- * Make sure to double check the template FAQs.
- * If you have customized the template and now have an issue, back-track to make sure you didn't make a mistake. If you have made changes and can't find the issue, please provide us with your changelog.
Version History (Changelog) #back to top
						-----------------------------------------------------------------------------------------
						Version 1 - Oct 8th, 2016
						-----------------------------------------------------------------------------------------

						- Initial Upload

						-----------------------------------------------------------------------------------------
						Version 2 - Nov 29th, 2016
						-----------------------------------------------------------------------------------------

						- Added a feature to enable user to submit a recipe from the App. The admin then can accept it or delete it from Admin Page.
						- Optional Grid View option for recipe list. Switchable from configurations.java.
						- Feature to Share Shopping Cart.
						- Grid View shows how much a recipe has been viewed and favorited
						- Added Cache to the app. This will enable the app to work offline, using the local data.
						- Fixed bug that prevented the app from loading more than a certain recipes.
						- Fixed the database collation to accept utf-8 characters.

						-----------------------------------------------------------------------------------------
						Version 3 - Feb 2nd, 2017
						-----------------------------------------------------------------------------------------

						- Bug Fix - Not uploading utf8 text in suggest recipe. Problems with arabic text.
						- Bug Fix - Recipe name is hidden when one column text is long. Fixed with staggered list.
						- Changed recipe order to Ascending order. Last Recipe uploaded will now display first.
						- Bug Fix - When a recipe was removed from favorites, all favorites were being removed.
						- Bug Fix - If no ad unit id was being added an error would be given.
						- Option to Send push notification to users when a recipe is saved.
						- The shopping cart is divided with Recipe Subheaders.
						- The shopping cart icon is replaced by a checked icon when an ingredient is added to shopping cart
						- Option to add Multiple images to each recipe. Now the user can scroll left/right on the image to see the next/previous image.

						-----------------------------------------------------------------------------------------
						Version 3.1 - March 14th, 2017
						-----------------------------------------------------------------------------------------

						- Bug Fix - The shopping cart deletes items in undo when closed
						- Utf-8 languages (arabic..) are now supported in app search.
						- Utf-8 languages (arabic..) are now supported in category names
						- Bug Fix - UI Issues with add recipe modal when adding an image/video.
						- Bug Fix - The app was not opening the right recipe when searching.
						- Bug Fix - Problem when refreshing catagories.
						- Bug Fix - The included .sql file had corrupted categories.

						-----------------------------------------------------------------------------------------
						Version 4 - Nov 15th, 2017
						-----------------------------------------------------------------------------------------
						- Mini Web App. This will make sharing of recipes better.
						- Added Preperation Time.
						- Added Cooking Time.
						- Added Difficulty.
						- Added Nutritional Information. This can be enabled/disabeled per recipe.
						- Each Recipe can now have its own default serving number.
						- When a user suggests a recipe, the app will redirect to home once the recipe is submitted.
						- User can suggest nutritional info, preperation time, cooking time and difficulty.
						- Added support for fractions or decimals in ingredients. Select from configurations.java.
						- Info page now supports UTF-8.
						- More support for Internet Explorer and Firefox.
						- Bug Fix - Solved ingredients scrolling issue.
						- Bug Fix - Premium Billing crash issue resolved.
						- Bug Fix - Go Premium Button only show when PUBLIC_KEY is filled [Extended License].
						- Bug Fix - App was crashing when recipe opened in landscape mode.
						- Bug Fix - Search issue.
						- Bug Fix - Ingredients will only be added once when taped more than once.
						- Bug Fix - If image is left empty, the loading image will show instead of nothing.

                        -----------------------------------------------------------------------------------------
						Version 4.1 - July 2nd, 2018
						-----------------------------------------------------------------------------------------
						- Bug Fix - prep time and cook time where not being shown. The app was scrolling down
                        - Bug Fix - Mini Web App now shows decimal values for ingredients
                        - Bug Fix - NullPointerException - IngredientsFragment.java:152
                        - Bug Fix - IllegalStateException - Functions.java:22
                        - Bug Fix - NullPointerException - AddRecipeFragment.java:334
                        - Bug Fix - NullPointerException - SingleRecipeActivity.java:142

                        -----------------------------------------------------------------------------------------
						Version 5.0 - Sept 21st, 2018
						-----------------------------------------------------------------------------------------
						- API updated to Api 27
                        - Adding of Privacy policy & Terms both in-app and on web app.
                        - Removed Google Analytics (to remove Advertising id as per Google Policy) – Use firebase analytics instead.
                        - UI Improvements – Changed ui from teal to white along with major ui changes.
                        - Bug Fix – Admin page was loading all recipes at once hanging the server.
                        - Bug Fix – Increased Ingredients & directions column size in database
                        - Added an empty list icon
                        - Added Category list to Home page

                        -----------------------------------------------------------------------------------------
                        VERSION 5.2 – 9TH AUG 2019
                        -----------------------------------------------------------------------------------------
                        - Bug Fix – Star icon was being hidden because the view scrolls down. View is now fully scrolled up on open.
                        - Bug Fix – Added padding below ingredients to make sure all tabs are visible
                        - Bug Fix – updated launcher icon name in manifest
                        - Bug Fix – Youtube stopped onPause & started onResume
                        - Bug Fix – Upload recipe error fixed
                        - Bug Fix – solved issue when no ingredients are set
                        - Bug Fix – All recipes were being loaded on server for nothing in the Admin page.
                        - Bug Fix – Solved crash issue on old devices. App was crashing because of vector image support
                        - Enabled usesClearTextTraffic in the manifest be default. Ideally you should use https and disable this.
                        - removed link on logo in web app
                        - updated Android Dependancies
                        - Firebase instance service removed (deprecated by firebase)
                        - Updated Fat Free framework to 3.6
                        - Added support to PHP7.3.8
iOS App
						-----------------------------------------------------------------------------------------
						Version 1 - Feb 24th, 2020
						-----------------------------------------------------------------------------------------

						- Initial Upload